Creating a Docker image for Jupyter + Octave
- Pre-requirements
- What is Jupyter?
- What is Octave?
- Let’s create our image
- Running a container that uses the image
- Using Jupyter
Pre-requirements
I am assuming you know what Docker is and have already installed it.
This tutorial has been tested on Ubuntu 18.04.
What is Jupyter?
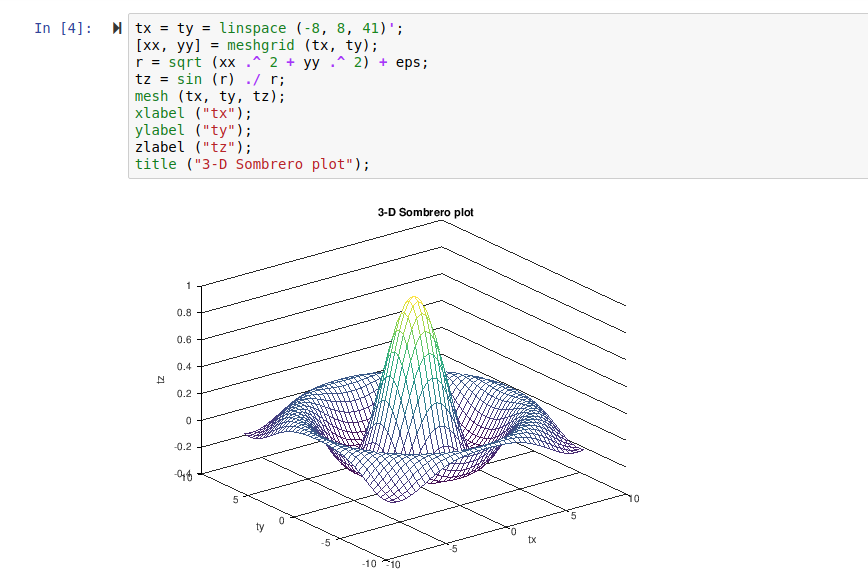
The Jupyter Notebook is an open-source web application that allows you to create and share documents that contain live code, equations, visualizations and narrative text. You should definitely try it! (Well, you are about to)
What is Octave?
GNU Octave is a programming language for scientific computing and its syntax is largely compatible with Matlab. Uses include: data cleaning and transformation, numerical simulation, statistical modeling, data visualization, machine learning, and much more.
Let’s create our image
Dockerfile overview
Docker builds images automatically by reading the instructions from a Dockerfile. A Dockerfile is a text file that contains all commands, in order, needed to build a given image.
Be aware that by default:
- The name of this file must be
Dockerfile(capital letterD). - You refer to a Dockerfile by its folder, not the file.
- Thus keep one Dockerfile per folder.
Where to create the Dockerfile (optional)
Create a folder called dockerfiles. So you can keep your Dockerfiles organized:
mkir dockerfiles
cd dockerfiles
Inside of the dockerfiles folder, create a new folder to each Dockerfile:
mkdir jupyter_octave
cd jupyter_octave
After creating your Dockerfile, the folder structure will look like:
dockerfiles\
└── jupyter_octave\
    └── Dockerfile
Creating the Dockerfile
Let’s create a Dockerfile per se for Jupyter + Octave:
vim Dockerfile
Copy/paste the content below and save it.
FROM jupyter/base-notebook

LABEL Description="Jupyter Octave"

USER root
RUN apt-get update && \
    apt-get install -y gnuplot octave && \
    apt-get clean

USER jovyan
RUN pip install octave_kernel && \
    export OCTAVE_EXECUTABLE=$(which octave)
Understanding each line of the Dockerfile
FROM jupyter/base-notebookA Dockerfile must start with a FROM instruction. It sets a base image from which we are going to create our own image. The jupyter/base-notebook is one of the Jupyter ready-to-run Docker Ubuntu-based images containing Jupyter applications and interactive computing tools.
LABEL Description="Jupyter Octave"The LABEL instruction adds metadata to an image as key-value pairs. There are plenty keys you should use to tell more about your image.
USER rootSet user root for subsequent commands. We need to do this because jupyter/base-notebook set a non-root user for the last commands.
RUN apt-get update && \
    apt-get install -y gnuplot octave && \
    apt-get clean
The RUN instruction will execute any commands in a new layer on top of the current image and commit the results. You should read more about how Docker reuses images layers to save time and space.
apt-get update — resynchronize the package index files from their sources so we get the most recent packages.
apt-get install -y gnuplot octave — install Gnuplot (portable command-line driven graphing utility ) and Octave per se. -y: automatic yes to prompts.
apt-get clean — cleaning up of the apt cache.
USER jovyan
RUN pip install octave_kernel && \
    export OCTAVE_EXECUTABLE=$(which octave)
pip install octave_kernel — run pip (a package manager for Python packages) to install the octave_kernel, a Jupyter kernel (program that runs and introspects the user’s code) for Octave.
export OCTAVE_EXECUTABLE=$(which octave) — set the OCTAVE_EXECTUABLE environment variable so the octave_kernel knows which Octave program to run.
Building the Docker image
In the folder of the Dockerfile, run:
docker build -t jupyter_octave:1.0 .
-t — give a meaningful name (tag) and version to your image!
. — refers to the current folder, in which the Dockerfile lives. Remember: it always refers to a folder, not a file.
Result:
REPOSITORY              TAG                 IMAGE ID            CREATED             SIZE
jupyter_octave          1.0                 6882724ff57e        21 seconds ago      1.58GB
...
Running a container that uses the image
Run:
docker container run --rm -p 8888:8888 --user root -e NB_GID=100 -v "$$PWD/work:/home/jovyan/work" -it --name jupyter_octave jupyter_octave:1.0
Understanding the run command and its flags
docker container run — run a command in a new container.
--rm — automatically remove the container when it exits.
-p 8888:8888 — publish a container’s port(s) to the host.
--user root — runs a container with the given command as root.
-e NB_GID=100 — set environment variables. NB_GID=100 instructs the Jupyter startup script to change the primary group of $NB_USER to $NB_GID (read the docs).
-v "$$PWD/work:/home/jovyan/work" — bind mount a volume (host folder:container folder). It is where you should save your Jupyter notebooks.
-it — is short for --interactive (Keep STDIN open even if not attached) + --tty (allocate a virtual text-only console (pseudo-TTY)). This will allow you to use the container like a shell as the bash prompt is running.
--name jupyter_octave — assign a name to the container.
jupyter_octave:1.0 — the name of the image.
Creating an alias to ease the run call
You can encapsulate the previous command using the make program.
Create a text file named Makefile
$ vim Makefile
Copy/paste the content below:
serve:
        @docker container run --rm \
                -p 8888:8888 \
                --user root \
                -e NB_GID=100 \
                -v "$$PWD/work:/home/jovyan/work" \
                -it --name jupyter_octave jupyter_octave:1.0 \
Now you can run your container this way:
$ make serve
Neat! :)
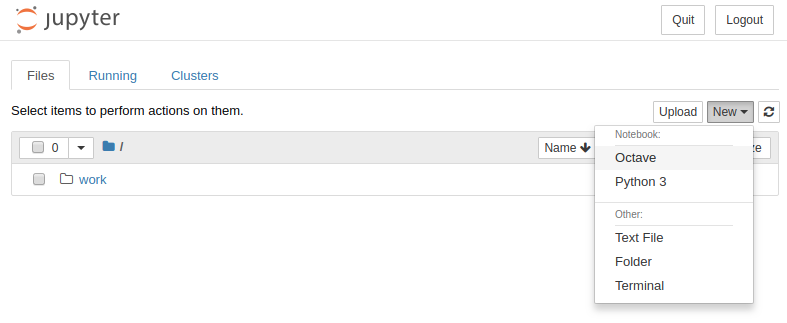
Using Jupyter
After running the container, you will hopefully see:
Set username to: jovyan
usermod: no changes
Executing the command: jupyter notebook
[I 12:12:16.094 NotebookApp] Writing notebook server cookie secret to /home/jovyan/.local/share/jupyter/runtime/notebook_cookie_secret
[I 12:12:16.392 NotebookApp] JupyterLab extension loaded from /opt/conda/lib/python3.6/site-packages/jupyterlab
...
[I 12:12:16.398 NotebookApp] Use Control-C to stop this server and shut down all kernels (twice to skip confirmation).
[C 12:12:16.398 NotebookApp]

    Copy/paste this URL into your browser when you connect for the first time,
    to login with a token:
        http://(8f77581c0875 or 127.0.0.1):8888/?token=afbe80780efd378ff3390d203006b987b6d77c1f7accfa0f
So follow the instructions to login with a token!
Copy/paste this URL into your browser when you connect for the first time, to login with a token:
http://(8f77581c0875 or 127.0.0.1):8888/?token=afbe80780efd378ff3390d203006b987b6d77c1f7accfa0f
For example, run this URL into you browser:
http://127.0.0.1:8888/?token=afbe80780efd378ff3390d203006b987b6d77c1f7accfa0f